
티스토리 뷰
인프런 이도원님의 'Spring Cloud로 개발하는 마이크로서비스(MSA)' 듣고 정리한 내용입니다.
Spring Cloud로 개발하는 마이크로서비스 애플리케이션(MSA) - 인프런 | 강의
Spring framework의 Spring Cloud 제품군을 이용하여 마이크로서비스 애플리케이션을 개발해 보는 과정입니다. Cloud Native Application으로써의 Spring Cloud를 어떻게 사용하는지, 구성을 어떻게 하는지에 대해
www.inflearn.com
1. User Microservice - Login
서비스 로직은 다음과 같다.
- 회원 로그인
- 회원 정보 수정/삭제
User Microservice의 API는 다음 표와 같다.
| 기능 | URI (API Gateway 사용 ⭕️) | URI (API Gateway 사용 ❌) | HTTP Method |
| 회원 로그인 | /user-service/login | login | POST |
| 회원 정보 수정 | |||
| 회원 정보 삭제 |
회원 정보 수정, 삭제는 혼자 해보기 (나중에..)
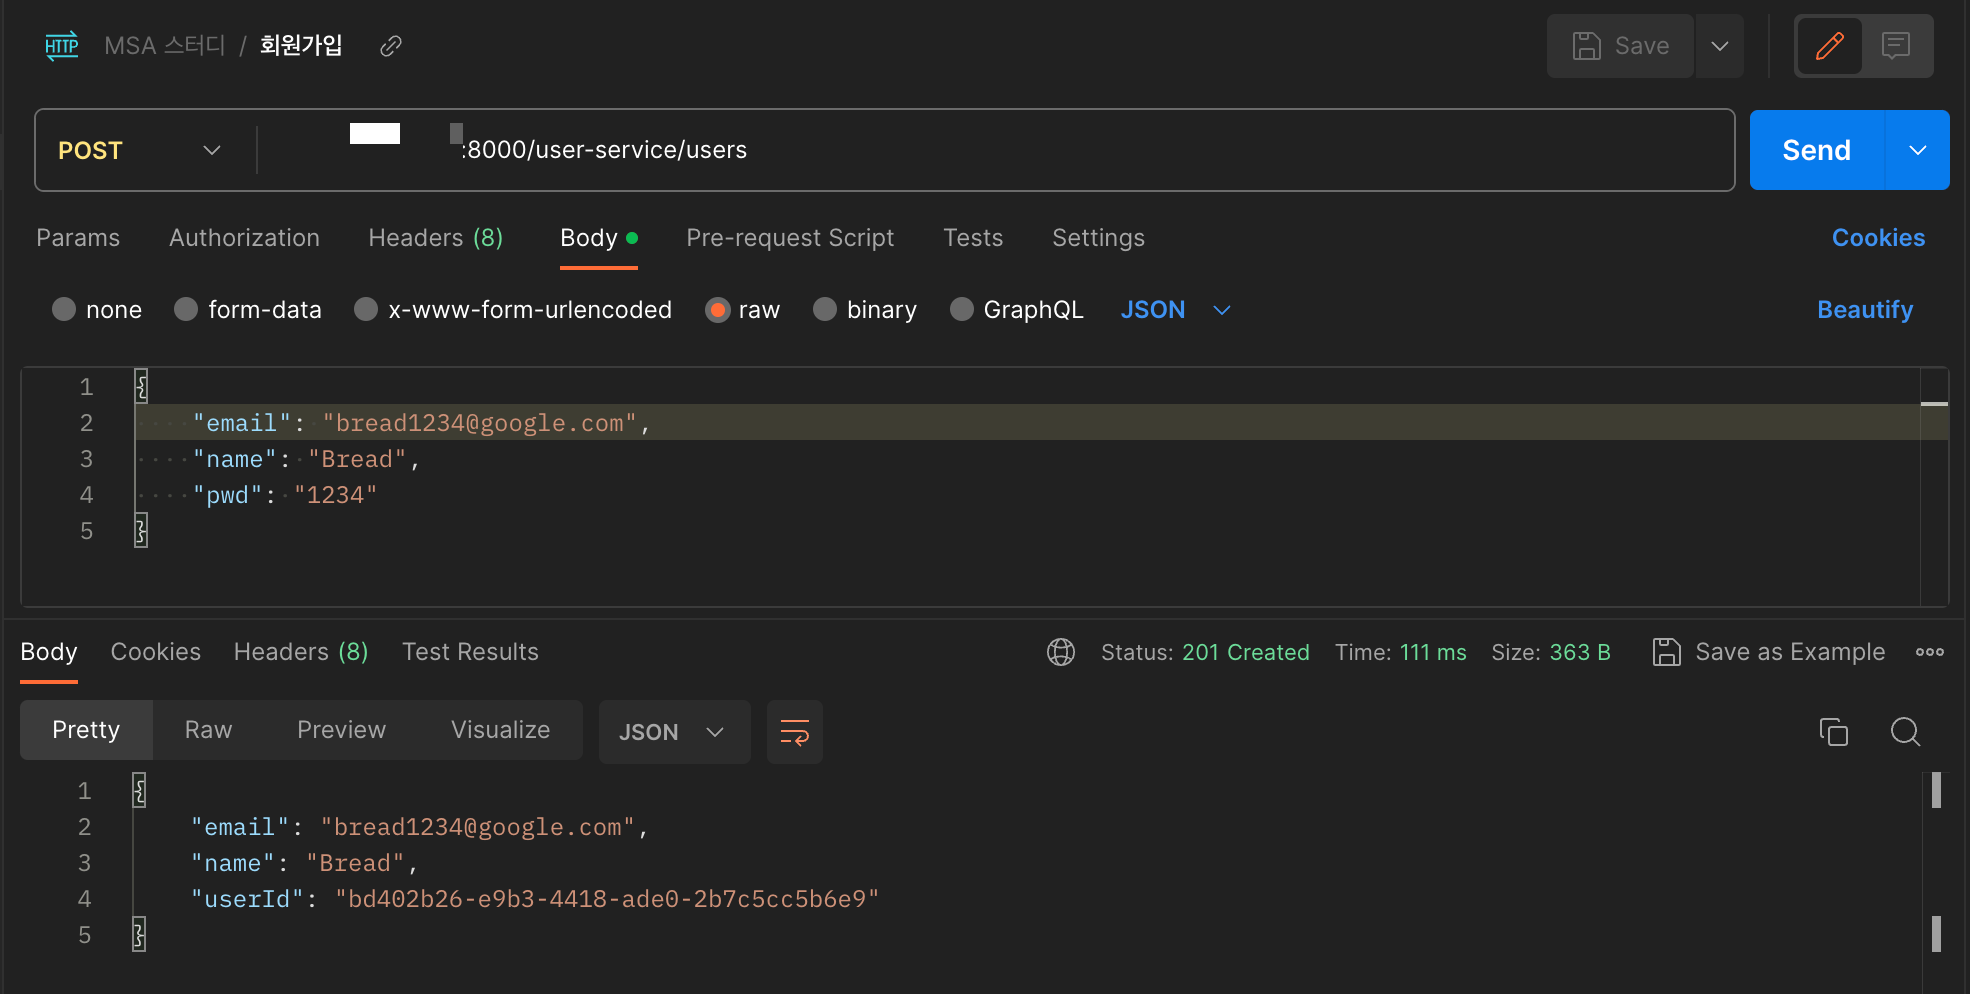
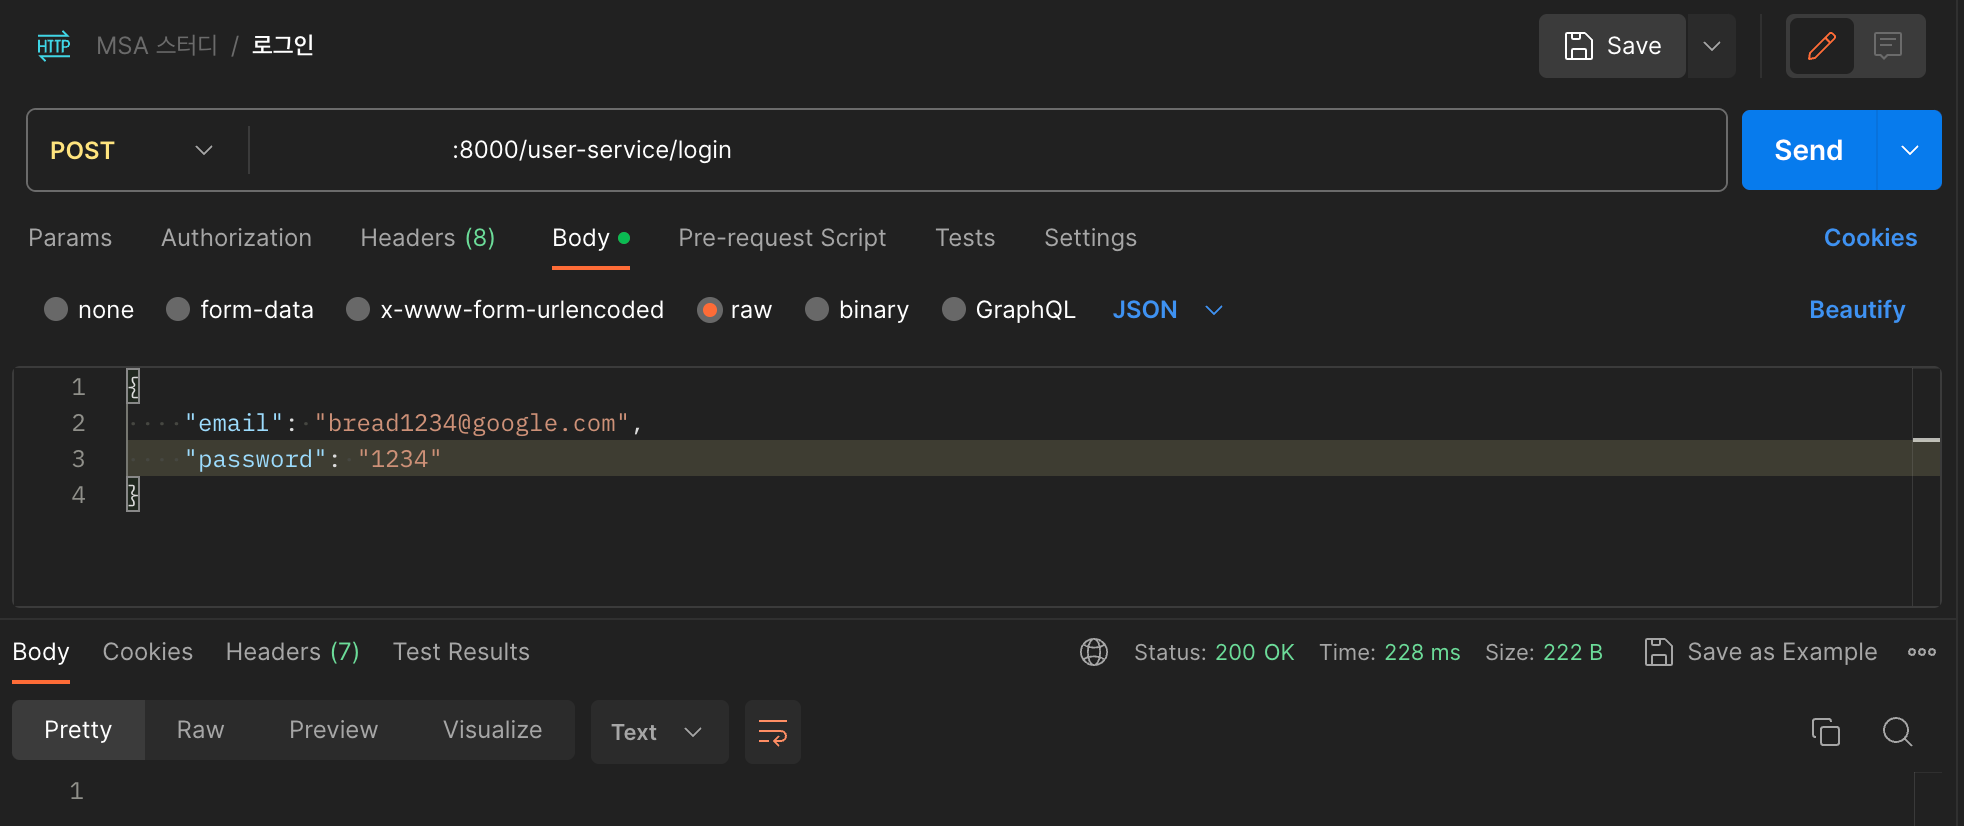
비밀번호는 plain text로 받지만 DB에 저장할 때는 Spring Security를 이용하여 encrypted된 비밀번호를 저장한다. 서버는 토큰과 userId를 반환하는데, 토큰은 정상적인 로그인이 되었다는 정보값을 토큰 형태(JWT)로 전해주고 userId는 회원가입 했을 때 UUID를 이용하여 랜덤한 값으로 지정해준다.
RequestLogin.java - 로그인에 정보를 입력했을 때 처리해주는 클래스
@Data
public class RequestLogin { // 사용자가 전달한 데이터값을 저장하기 위한 클래스

    @NotNull(message = "Email cannot be null")
    @Size(min = 2, message = "Email not be less than two characters")
    @Email
    private String email;

    @NotNull(message = "Password cannot be null")
    @Size(min = 8, message = "Password must be equals or grater than eight characters")
    private String password;
}
다음! 인증 정보를 만들어보자.
사용자가 입력한 정보를 Spring Security에서 사용할 수 있는 형태의 값으로 변환하기 위해서 UsernamePasswordAuthenticationToken으로 변환해주어야 한다. 인증 처리해주는 AuthenticationManager에 전달하면 아이디와 비밀번호를 비교해준다.
AuthenticationFilter.java
public class AuthenticationFilter extends UsernamePasswordAuthenticationFilter {

    // 요청정보를 보냈을 때 처리해줄 수 있는 메서드
    @Override
    public Authentication attemptAuthentication(HttpServletRequest request,
                                                HttpServletResponse response) throws AuthenticationException {
        try {
            RequestLogin creds = new ObjectMapper().readValue(request.getInputStream(), RequestLogin.class);
            // input 안에 있는 stream을 자바 클래스 타입으로 변경
            // -> post 형태로 전달되는 것은 @RequestParam으로 받을 수 없기 때문에 inputstream으로 처리하여 수작업으로 어떤 데이터가 들어왔는지 확인

            return getAuthenticationManager().authenticate(
                    new UsernamePasswordAuthenticationToken(
                            creds.getEmail(),
                            creds.getPassword(),
                            new ArrayList<>() // 어떤 권한을 가질 것인지
                    )
            );
        } catch (IOException e) {
            throw new RuntimeException(e);
        }
    }

    // 로그인을 성공했을 때 정확하게 어떤 값을 반환할 것인지 / 어떤 처리를 해줄 것인지
    @Override
    protected void successfulAuthentication(HttpServletRequest request,
                                            HttpServletResponse response,
                                            FilterChain chain,
                                            Authentication authResult) throws IOException, ServletException {
        super.successfulAuthentication(request, response, chain, authResult);
    }
}
WebSecurity.java
@Configuration
@EnableWebSecurity
public class WebSecurity {

    private UserService userService;
    private BCryptPasswordEncoder bCryptPasswordEncoder;
    private Environment env;
    private ObjectPostProcessor<Object> objectPostProcessor;

    private static final String[] WHITE_LIST = {
        "/users/**", "/**"
    };

    public WebSecurity(Environment env, UserService userService, BCryptPasswordEncoder bCryptPasswordEncoder, ObjectPostProcessor<Object> objectPostProcessor) {
        this.env = env;
        this.userService = userService;
        this.bCryptPasswordEncoder = bCryptPasswordEncoder;
        this.objectPostProcessor = objectPostProcessor;
    }

    @Bean
    protected SecurityFilterChain config(HttpSecurity http) throws Exception {
        http.csrf().disable();
        http.headers().frameOptions().disable();
        http.authorizeHttpRequests(authorize -> {
                    try {
                        authorize
//                .requestMatchers(WHITE_LIST).permitAll()); // 모든 요청에 대해 허가
                                .requestMatchers("/**").permitAll() // 인증이 되어진 상태에서만 추가적인 기능 사용 가능
                                .requestMatchers(new IpAddressMatcher("220.93.52.132")).permitAll()
                                .and()
                                .addFilter(getAuthenticationFilter());
                    } catch (Exception e) {
                        e.printStackTrace();
                    }
                });
        // 인증 작업 없이 사용할 수 있는 범위를 지정
        return http.build();
    }

    private AuthenticationFilter getAuthenticationFilter() throws Exception {
        AuthenticationManagerBuilder builder = new AuthenticationManagerBuilder(objectPostProcessor);
        AuthenticationFilter authenticationFilter = new AuthenticationFilter();
        authenticationFilter.setAuthenticationManager(authenticationManager(builder));

        return authenticationFilter;
    }

    // 인증을 만들고 인증 처리하는 configure 메서드
    @Bean
    AuthenticationManager authenticationManager(AuthenticationManagerBuilder auth) throws Exception {
        // userDetailsService: 사용자가 전달한 정보를 가지고 로그인 처리해줌
        // select pwd from users where email=? -> userDetailsService에서 작업 (사용자 검색해주는 로직은 UserService에서!)
        // db_pwd(encrypted) == input_pwd(encrypted)
        auth.userDetailsService(userService).passwordEncoder(bCryptPasswordEncoder);

        return auth.build();
    }
}
hasIpAddress도 현재 deprecated 되었다. 대신 사용할 수 있는 메서드가 다양했는데 그 중에서도 1번 방법을 사용했다.
1) new IpAddressMatcher("IP 주소")
2) .access("hasIpAddress('" + IP 주소 + "')")
UserService.java - UserDetailsService 상속받기
public interface UserService extends UserDetailsService {
UserServiceImpl.java - loadUserByUsername 메서드 재정의
@Service
public class UserServiceImpl implements UserService {

    UserRepository userRepository;
    BCryptPasswordEncoder passwordEncoder; // 비밀번호를 암호화를 위한 변수

    @Autowired
    public UserServiceImpl(UserRepository userRepository, BCryptPasswordEncoder passwordEncoder) {
        this.userRepository = userRepository;
        this.passwordEncoder = passwordEncoder;
    }

    ...

    @Override
    public UserDetails loadUserByUsername(String username) throws UsernameNotFoundException {
        // 데이터베이스에서 repository 값을 가지고 검사하는 부분 완성
        UserEntity userEntity = userRepository.findByEmail(username);

        if (userEntity == null) // 회원정보가 없을 경우
            throw new UsernameNotFoundException(username);

        return new User(userEntity.getEmail(), userEntity.getEncryptedPwd(),
                true, true, true, true,
                new ArrayList<>()); // 로그인이 되었을 때 할 수 있는 작업 중에서 권한을 추가하는 작업
        // 여기서 User는 Spring Security에서 제공하는 UserDetails, 이메일로 검색이 잘 끝났다면 pwd 비교해야 하고 pwd 비교도 잘 끝났다면 검색된 사용자 값을 반환!
    }
}
UserRepository.java - findByEmail 메서드 추가
public interface UserRepository extends CrudRepository<UserEntity, Long> {
    UserEntity findByUserId(String userId);
    UserEntity findByEmail(String username);
}
이제 API Gateway로 가서 Filter 정보를 수정해주자.
application.yml
spring:
  application:
    name: apigateway-service
  cloud:
    gateway:
      default-filters:
        - name: GlobalFilter
          args:
            baseMessage: Spring Cloud Gateway Glboal Filter
            preLogger: true
            postLogger: true
      routes:
        - id: user-service
          uri: lb://USER-SERVICE
          predicates:
            - Path=/user-service/login
            - Method=POST
          filters:
            - RemoveRequestHeader=Cookie
            - RewritePath=/user-service/(?<segment>.*), /$\{segment}
        - id: user-service
          uri: lb://USER-SERVICE
          predicates:
            - Path=/user-service/users
            - Method=POST
          filters:
            - RemoveRequestHeader=Cookie
            - RewritePath=/user-service/(?<segment>.*), /$\{segment}
        - id: user-service
          uri: lb://USER-SERVICE
          predicates:
            - Path=/user-service/**
            - Method=GET
          filters:
            - RemoveRequestHeader=Cookie
            - RewritePath=/user-service/(?<segment>.*), /$\{segment}
기존 user service 등록해주었던 것은 주석처리하고 조건에 따라 변환 작업을 해주었다.
1. login 정보가 요청될 경우
2. 회원가입 했을 경우
3. 그 외 나머지
RemoveRequestHeader: 요청되었던 Header 값을 삭제 (Post로 전달되는 값은 매번 새로운 데이터로 인식하기 위해)
RewritePath: Path를 다시 설정 (segment? 구조를 아직 잘 이해 못했다..)
이렇게 predicates에 Path를 설정하면 그 데이터 하나에 대해서만 조건을 추가할 수 있게 된다.
그럼 테스트를 해보자.
처음에 포스트맨으로 로그인을 시도했을 때 404에러가 발생했다..
경로도 맞게 설정했고 Filter 설정도 문제가 없는데 원인이 뭘까 찾아보니까
AuthenticationFilter.java
@Override
protected void successfulAuthentication(HttpServletRequest request,
		HttpServletResponse response,
		FilterChain chain,
		Authentication authResult) throws IOException, ServletException {
		// super.successfulAuthentication(request, response, chain, authResult);
}
RestAPI Server이기 때문에 로그인 페이지를 응답할 필요가 없으니 반환값을 변경해주었어야 했다. 😮💨
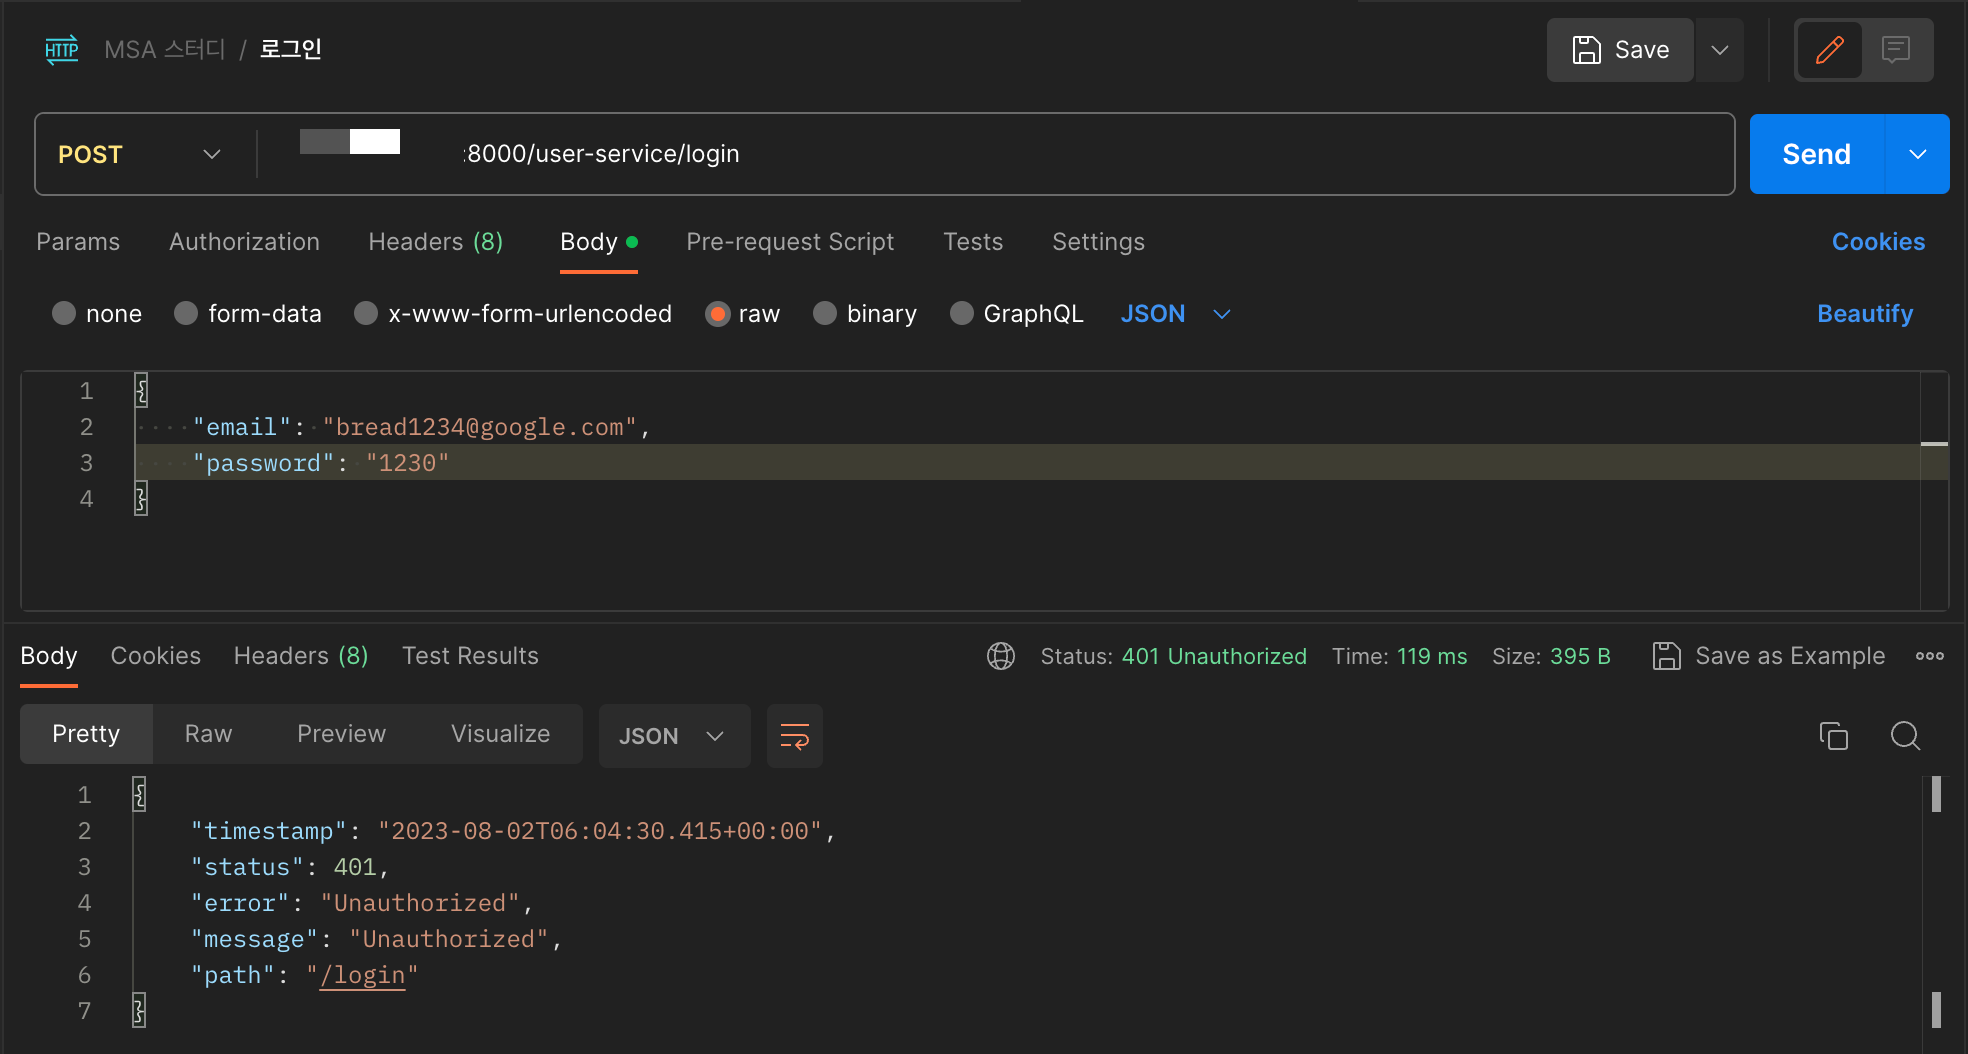
만약 비밀번호를 틀린다면?
Web Secrutiy에 Filter를 등록해둔 상태이다. 잘 작동되는지 디버깅 모드로 확인해보자.
디버깅 모드 → 현재 단계에서 어떤 값을 사용할 수 있는지 값을 체크해볼 수 있다.
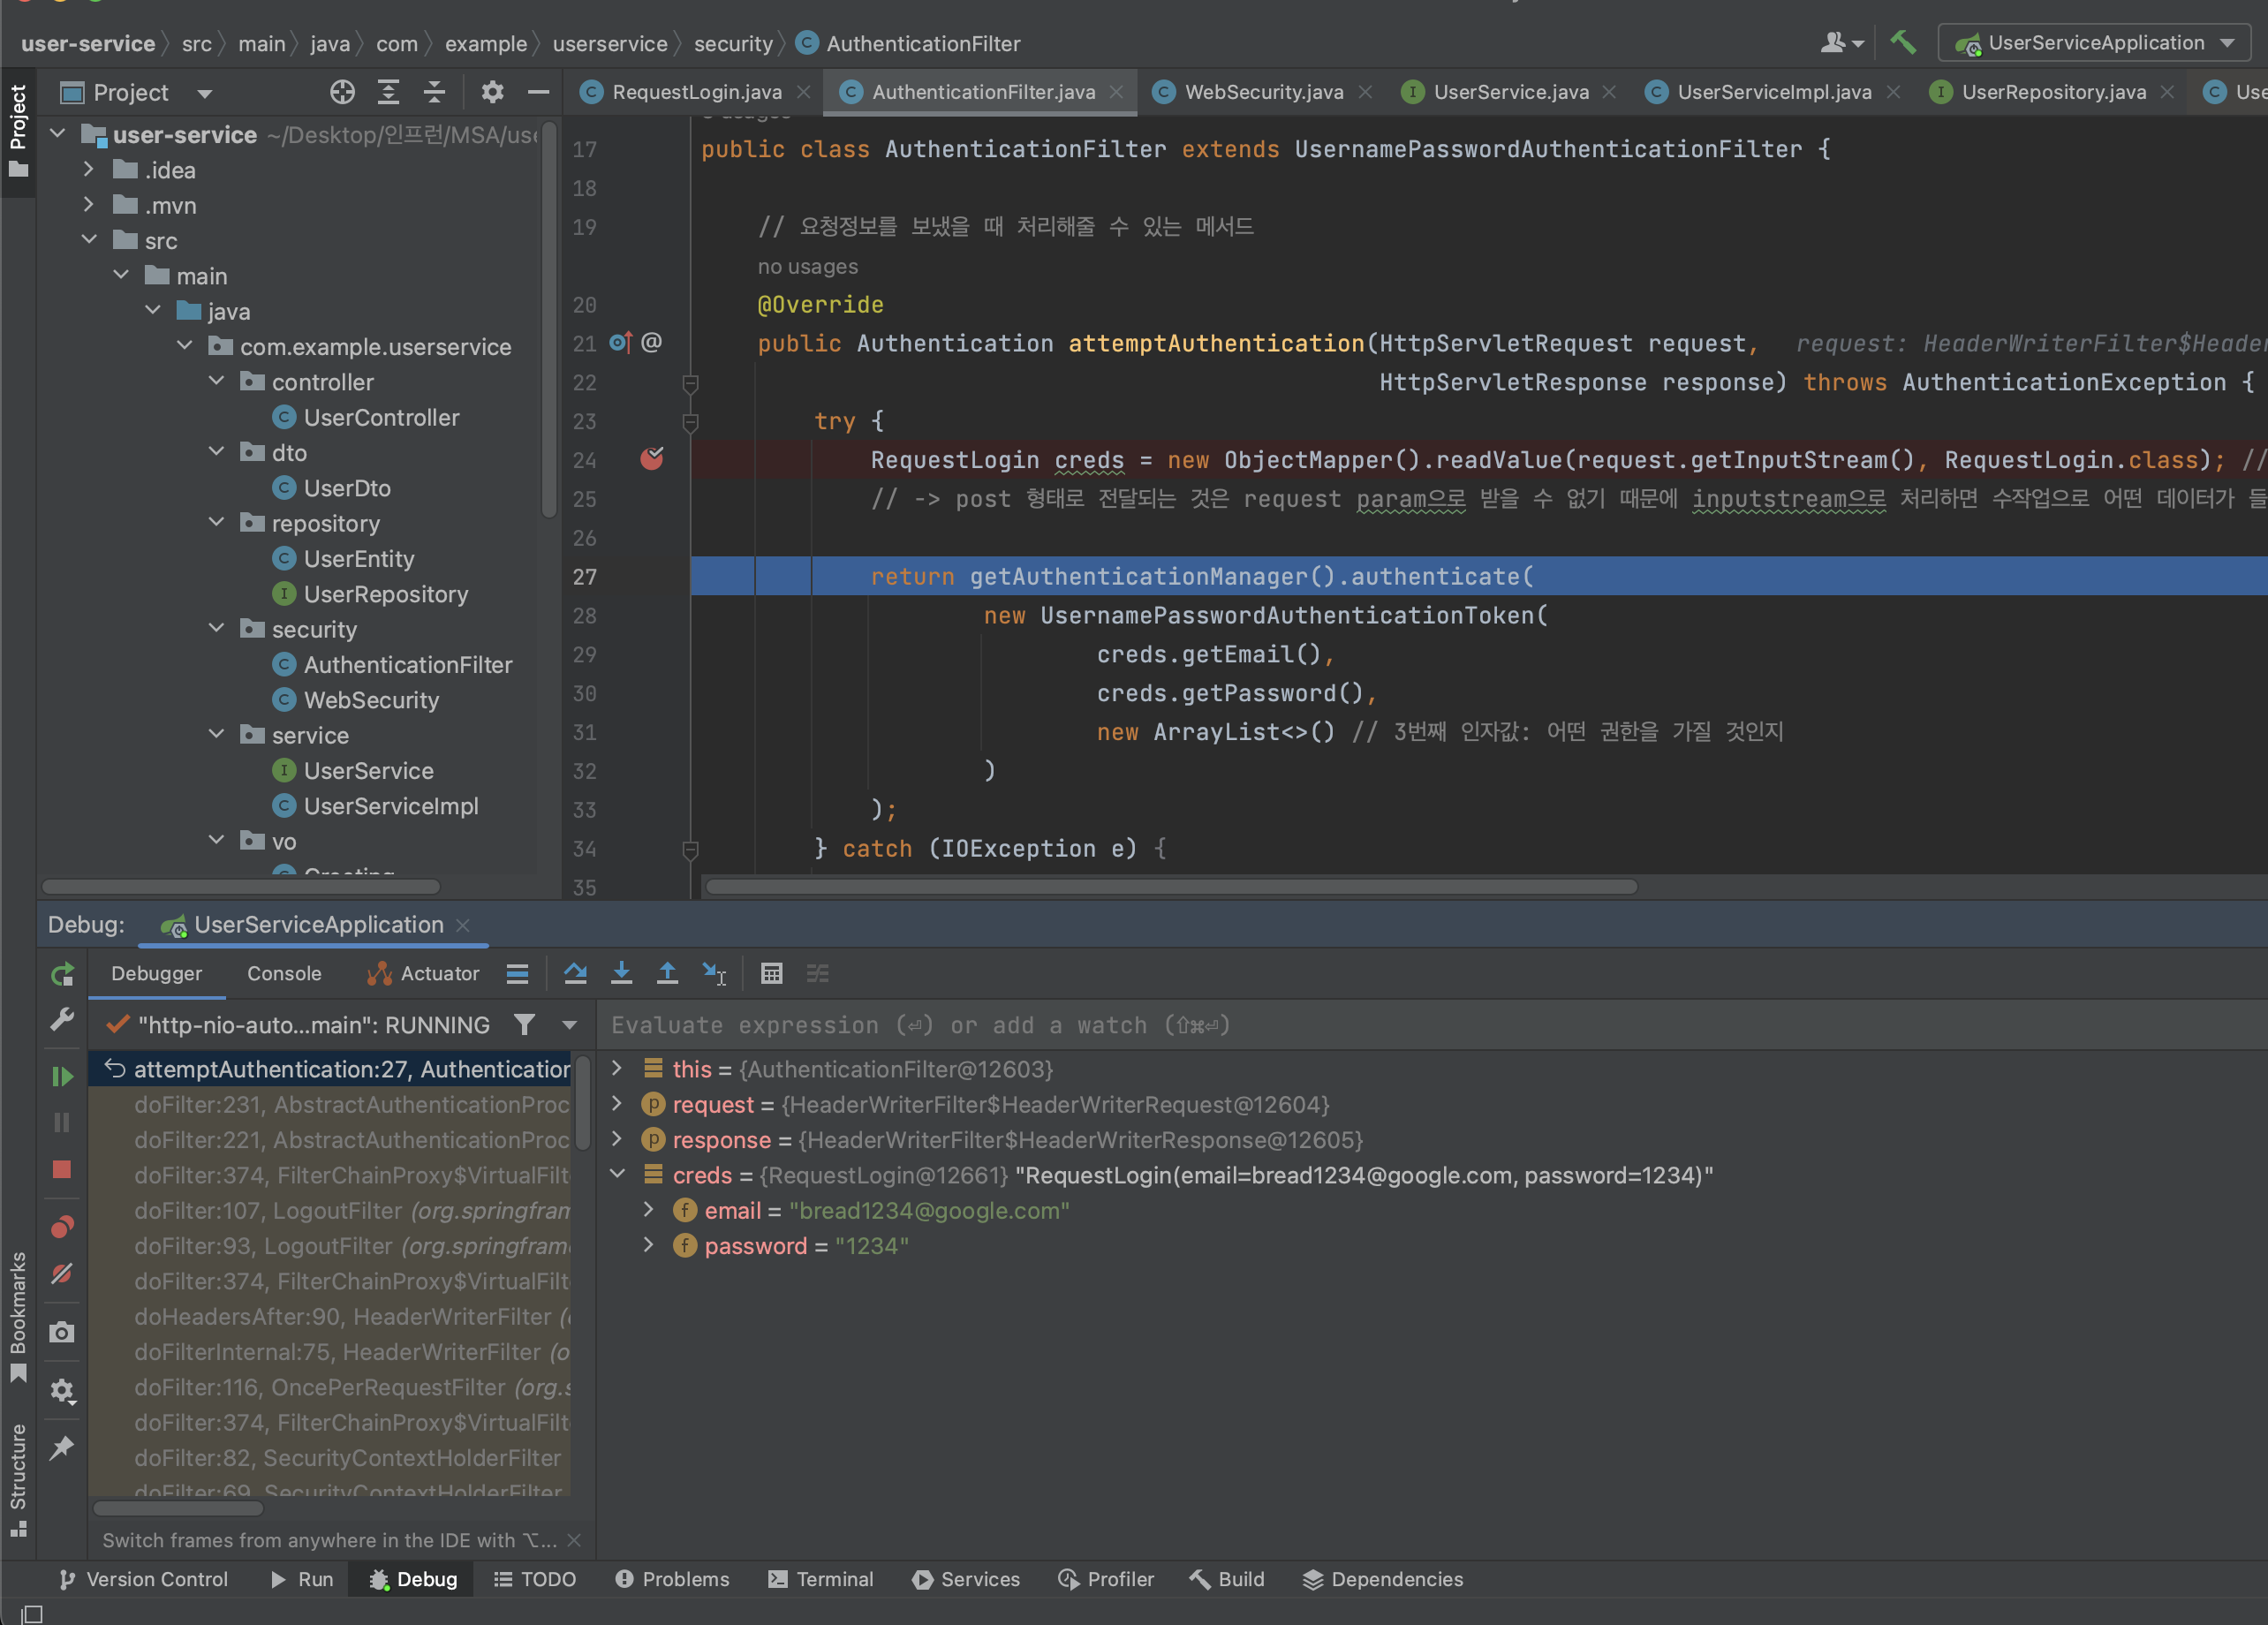
이제... 로그인을 성공했을 때와 실패했을 때 반환해주는 토큰을 successfulAuthentication에서 구현해줄 것이다.
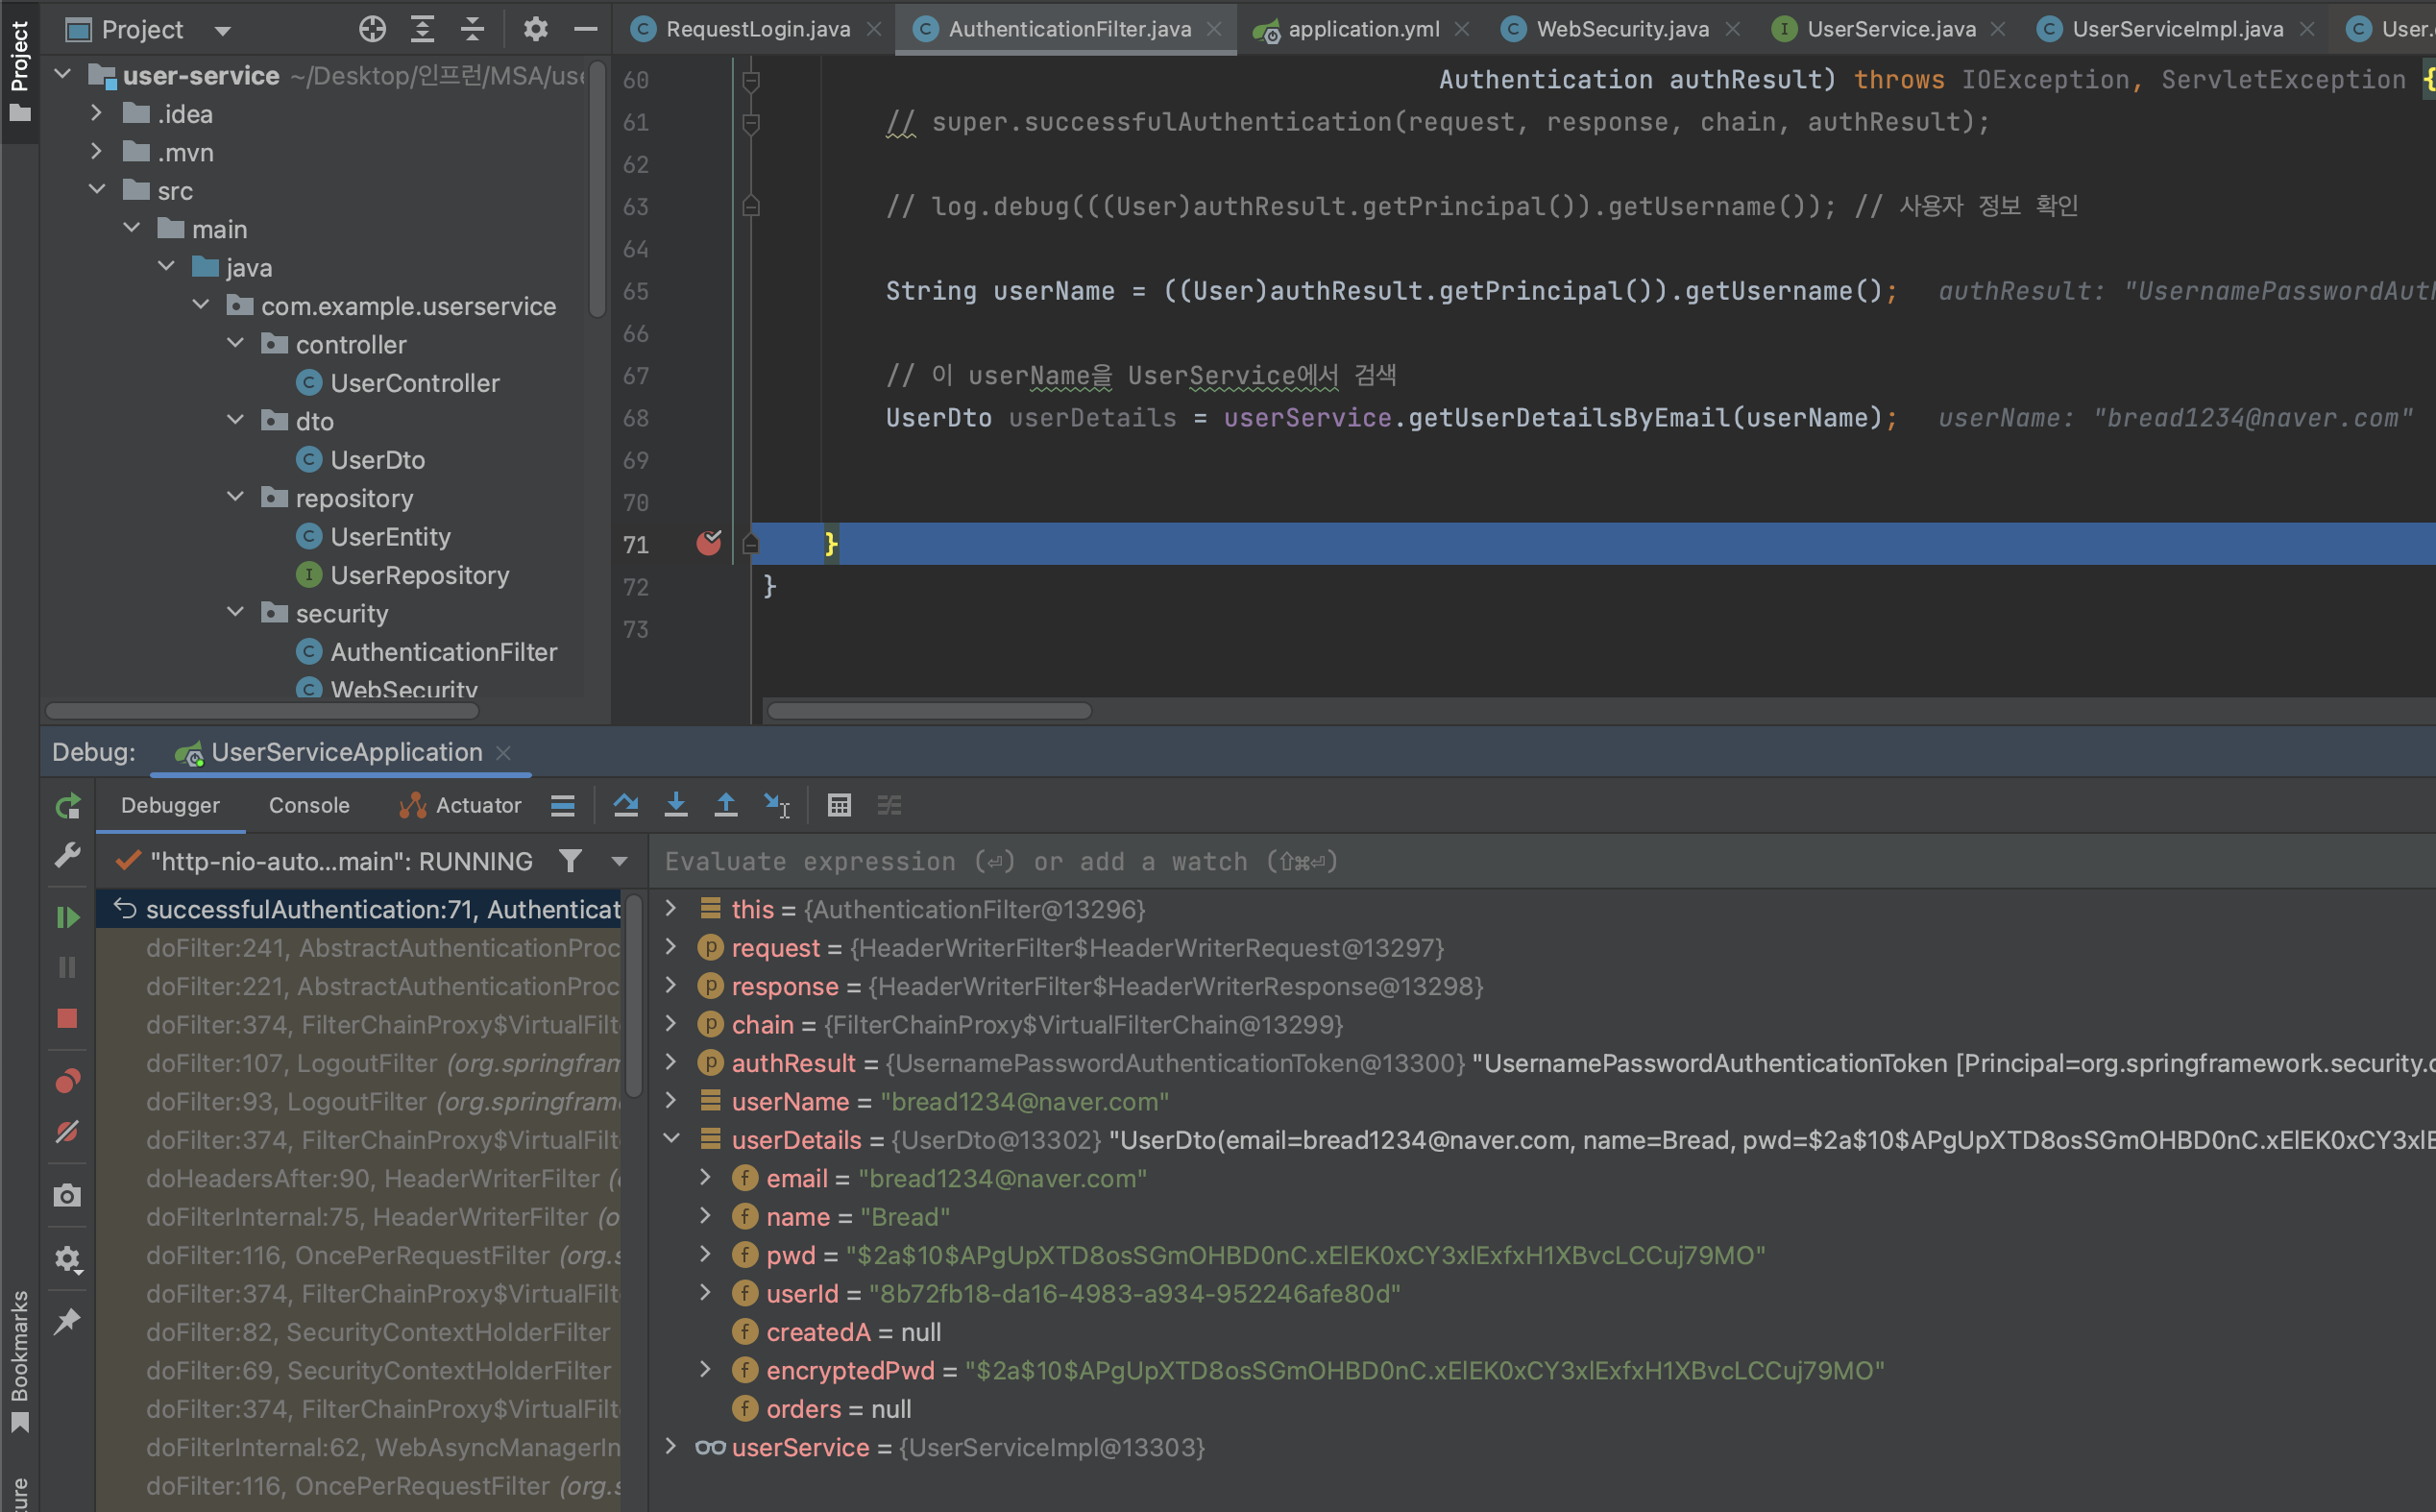
사용자가 로그인을 했을 때 제일 먼저 실행되는 클래스는 AuthenticationFilter이다. 이 클래스에서 첫 번째 메서드인 attemptAuthentication에서는 어떤 정보가 호출되는지 알 수 있었다. 로그를 이용하여 successfulAuthentication에서 값을 확인해보자.
@Override
protected void successfulAuthentication(HttpServletRequest request,
		HttpServletResponse response,
		FilterChain chain,
		Authentication authResult) throws IOException, ServletException {
	log.debug(((User)authResult.getPrincipal()).getUsername()); // 사용자 정보 확인 (이메일)
}
< 디버깅 모드로 값 확인해볼 때 🔴 위치>
1. attemptAuthentication - RequestLogin
2. successfulAuthentication
3. UserServiceImpl - loadUserByUsername - Userentity
<정리>
1. 사용자가 정보를 입력
2. 정보가 AuthenticationFilter로 전달 - attemptAuthentication() 메서드가 처리
3. UsernamePasswordAuthenticationToken 형태로 바꿔서 사용
4. UserDetailService - loadUserByUsername()
➡️ 이 메서드는 UserRepository에서 findByEmail로 DB에서 해당 데이터를 검색해서 찾는다.
➡️ DB에서 가져올 때는 UserEntity여서 User라는 객체로 변경하여 UserDetailService에서 사용한다.
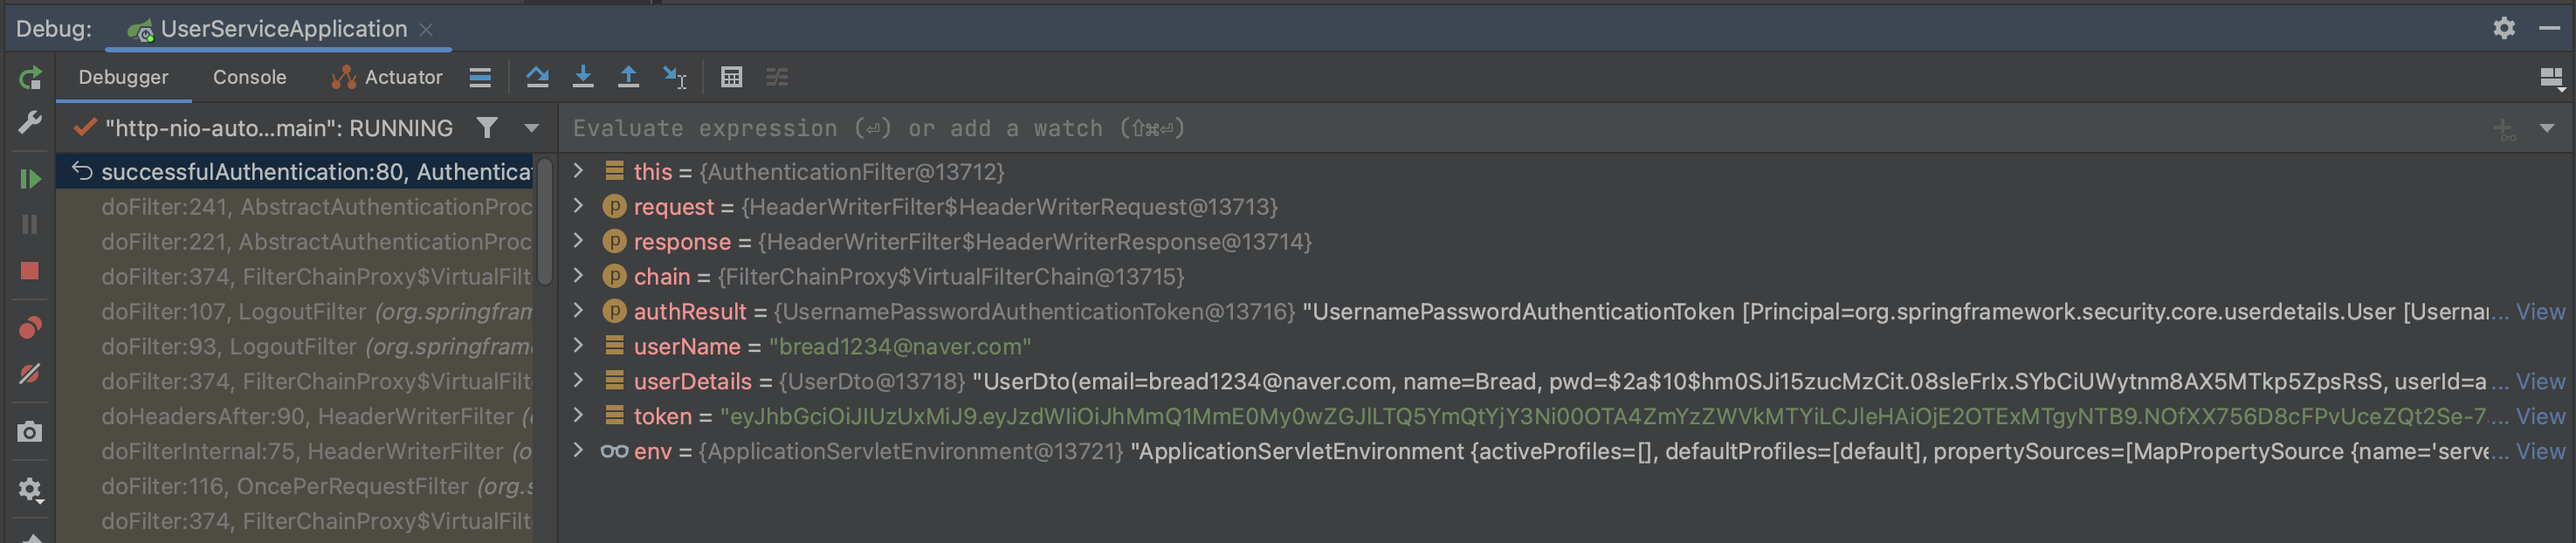
5. 정상적으로 로그인이 되었을 경우 successfulAuthentication()에서 해당 토큰을 발행해야 한다.
➡️ 이때 userId(UUID로 만든 랜덤번호)를 가지고 토큰을 만들 것이다. (현재 반환값은 userEmail이었음)
그래서!! UserService에서 getUserDetailsByEmail 메서드를 통해 이메일을 가지고 데이터베이스에서 정보를 가지고 와서 UserDto에 반환하고 여기서 userId를 통해 JWT를 생성할 것이다.
AuthenticationFilter.java
@Slf4j
public class AuthenticationFilter extends UsernamePasswordAuthenticationFilter {

    private UserService userService;
    private Environment env;

    public AuthenticationFilter(AuthenticationManager authenticationManager, UserService userService, Environment env) {
        super(authenticationManager); // super.setAuthenticationManager(authenticationManager);
        this.userService = userService;
        this.env = env;
    }

    @Override
    public Authentication attemptAuthentication(HttpServletRequest request,
                                                HttpServletResponse response) throws AuthenticationException {
        try {
            RequestLogin creds = new ObjectMapper().readValue(request.getInputStream(), RequestLogin.class); // input 안에 있는 stream을 자바 클래스 타입으로 변경

            return getAuthenticationManager().authenticate(
                    new UsernamePasswordAuthenticationToken(
                            creds.getEmail(),
                            creds.getPassword(),
                            new ArrayList<>()
                    )
            );
        } catch (IOException e) {
            throw new RuntimeException(e);
        }
    }

    @Override
    protected void successfulAuthentication(HttpServletRequest request,
                                            HttpServletResponse response,
                                            FilterChain chain,
                                            Authentication authResult) throws IOException, ServletException {

        String userName = ((User)authResult.getPrincipal()).getUsername();
        UserDto userDetails = userService.getUserDetailsByEmail(userName);
    }
}
WebSecurity에서 configure에서 인코딩 작업했기 때문에 pwd는 암호화된 값이다.
userDetails.getEncryptedPwd().equals(userDetails.getPwd()) → 결과 true
다음! 이 Dto를 가지고 토큰 만들기-
2. JWT (Json Web Token)
pom.xml - 라이브러리 추가
<dependency>
	<groupId>io.jsonwebtoken</groupId>
	<artifactId>jjwt</artifactId>
	<version>0.9.1</version>
</dependency>
<dependency>
	<groupId>javax.xml.bind</groupId>
	<artifactId>jaxb-api</artifactId>
	<version>2.3.1</version>
</dependency>
JDK11 이후부터는 Java EE API가 빠져서 따로 JAXB API jar를 추가해주어야 한다.
안 그럼
java.lang.ClassNotFoundException: javax.xml.bind.DatatypeConverter
이런 오류 납니다...
application.yml
token:
  expiration_time: 86400000 #하루 (초단위)
  secret: user_token
(user-service) AuthenticationFilter.java
@Override
protected void successfulAuthentication(HttpServletRequest request,
HttpServletResponse response,
FilterChain chain,
Authentication authResult) throws IOException, ServletException {
String userName = ((User)authResult.getPrincipal()).getUsername();
UserDto userDetails = userService.getUserDetailsByEmail(userName);
String token = Jwts.builder()
.setSubject(userDetails.getUserId())
.(new Date(System.currentTimeMillis() +
Long.parseLong(env.getProperty("token.expiration_time")))) // application.yml에서 가져온 값은 String이기 때문에 사용하려면 형변환 필요
.signWith(SignatureAlgorithm.HS512, env.getProperty("token.secret")) // 암호화
.compact();
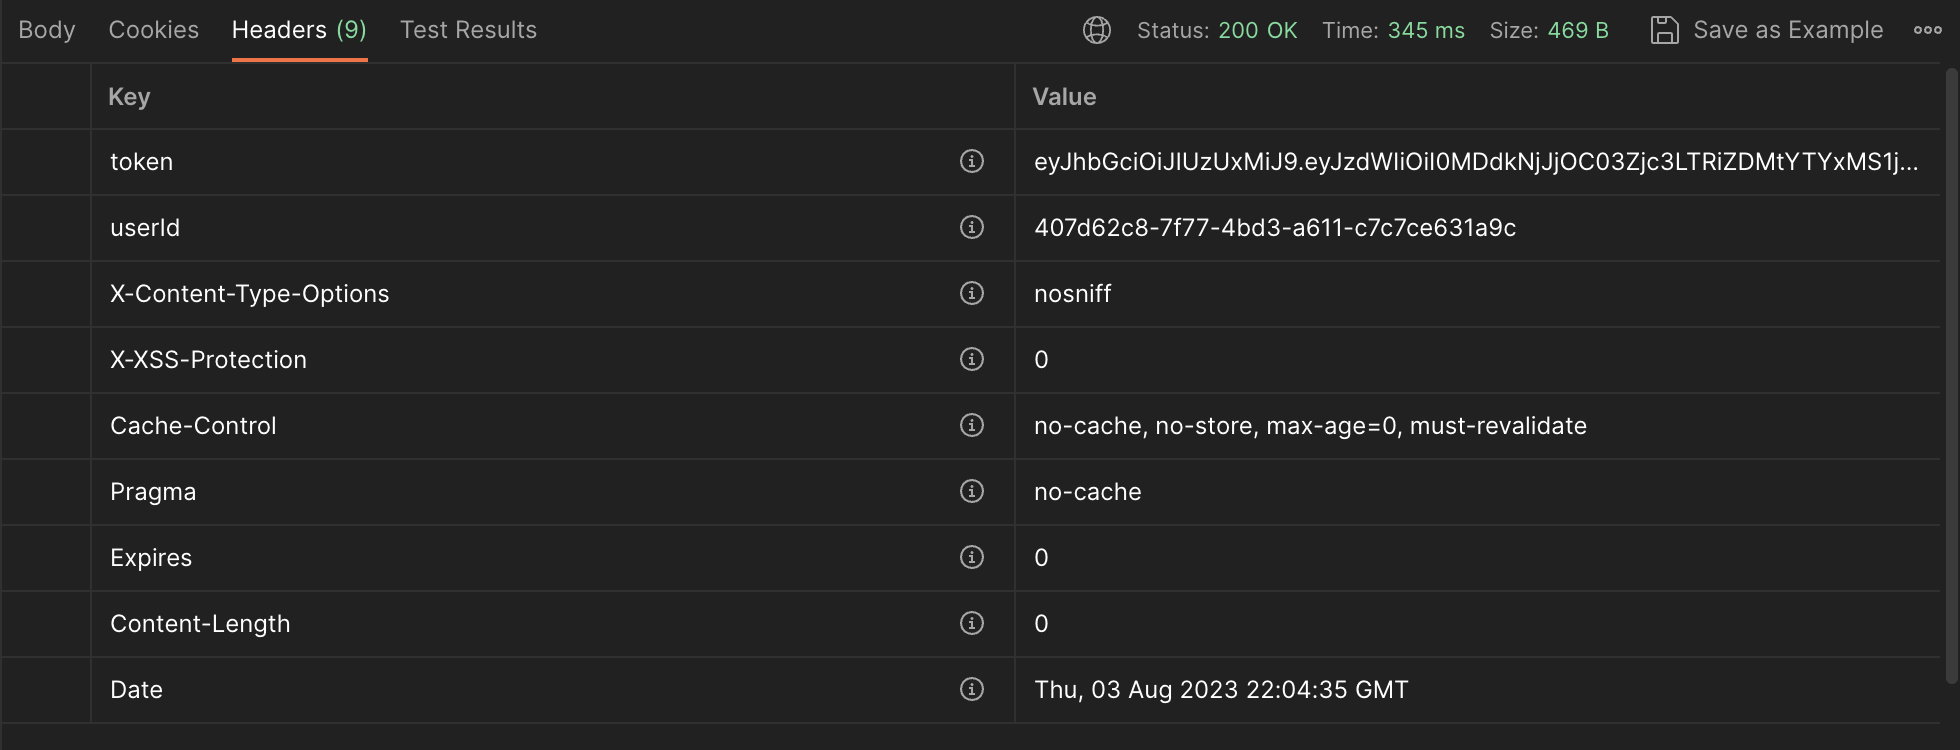
response.addHeader("token", token);
response.addHeader("userId", userDetails.getUserId());
}
토큰을 만들어서 헤더값에 넣어주었다.
전통적인 인증 시스템은 세션 정보와 쿠키를 이용한 방법이었는데, 이 방법은 모바일 애플리케이션에서 유효하게 사용할 수 없다는 문제가 있다. 현재는 세션 정보 대신 토큰을 생성하여 헤더값에 넣어서 인증하는 형태로 진행된다.
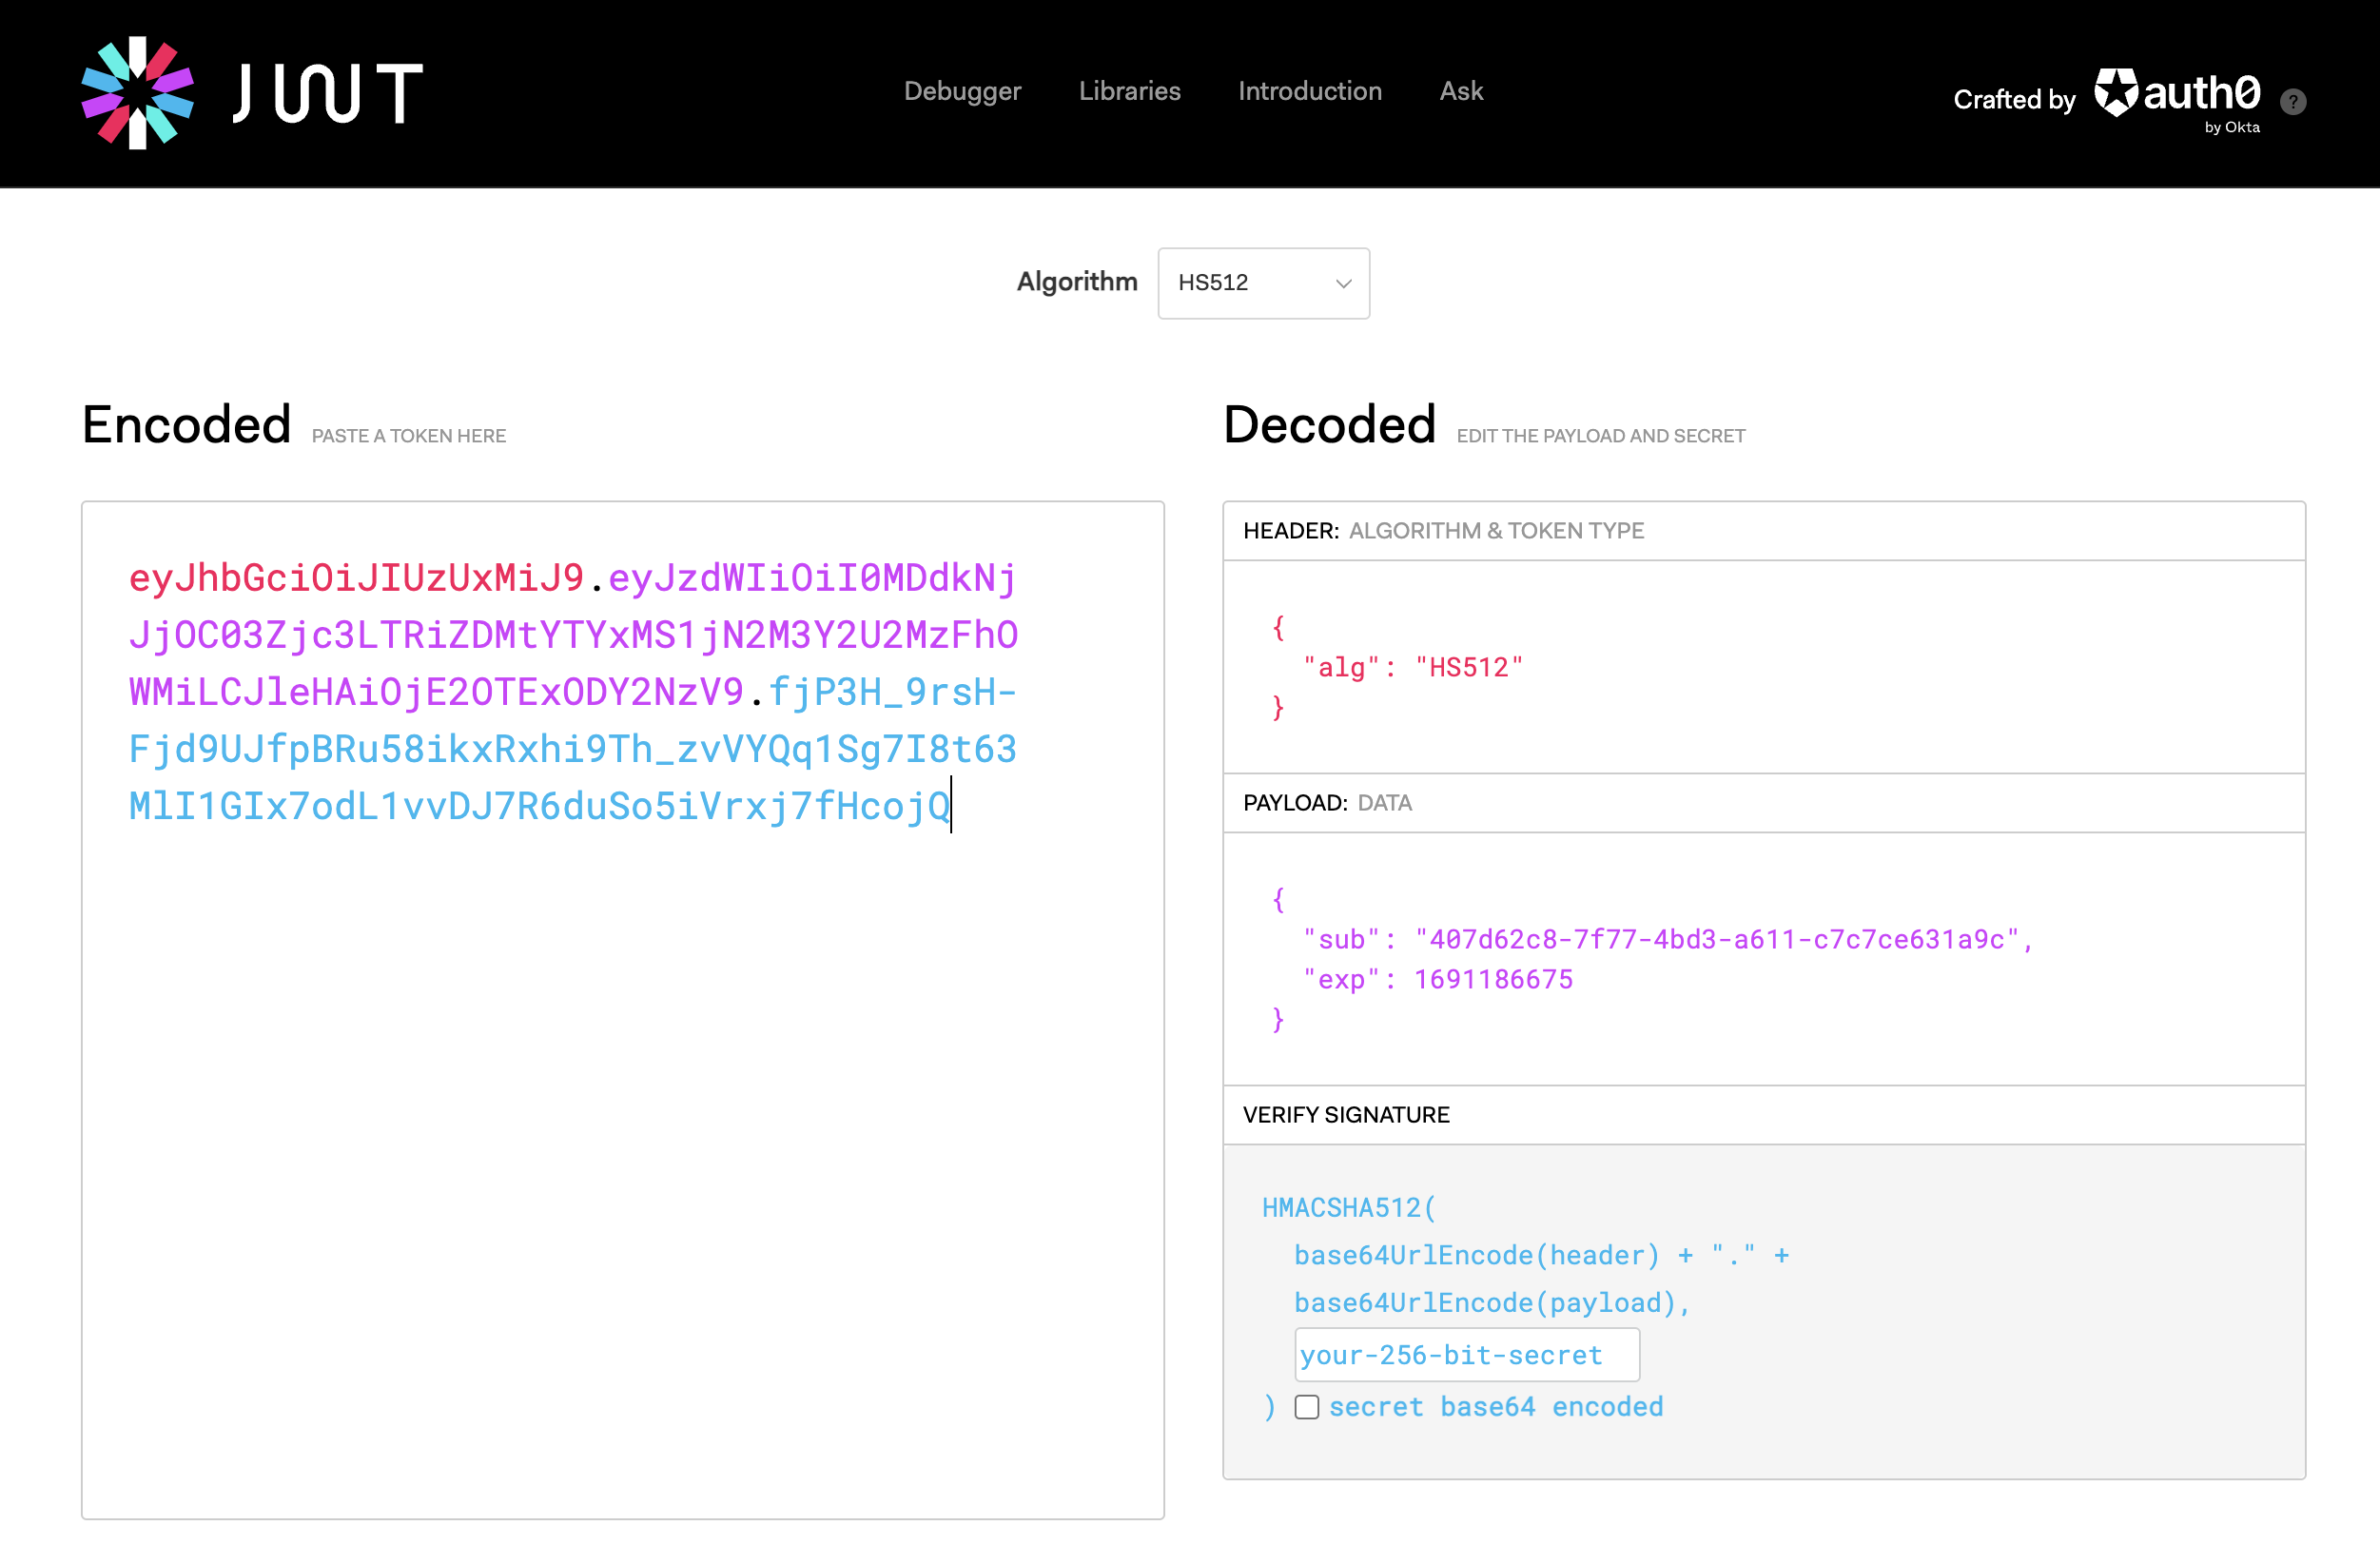
여기서 "sub" 값이 userId값이다.
JWT 장점
- 클라이언트 독립적인 서비스
- CDN (중간 단계에서 캐시 서버로 인증 처리 가능)
- No Cookie-Session (사이트 간 요청 정보 위조될 확률 적어짐)
- 지속적인 토큰 저장
인증이 필요 없는 부분
1. 회원가입
2. 로그인 (userId pwd 전달되서 토큰이 발생되는 부분)
3. API Gateway service - AuthorizationHeaderFilter
pom.xml - 라이브러리 추가
<dependency>
	<groupId>io.jsonwebtoken</groupId>
	<artifactId>jjwt</artifactId>
	<version>0.9.1</version>
</dependency>
<dependency>
	<groupId>javax.xml.bind</groupId>
	<artifactId>jaxb-api</artifactId>
	<version>2.3.1</version>
</dependency>
application.yml
        - id: user-service
          uri: lb://USER-SERVICE
          predicates:
            - Path=/user-service/**
            - Method=GET
          filters:
            - RemoveRequestHeader=Cookie
            - RewritePath=/user-service/(?<segment>.*), /$\{segment}
            - AuthorizationHeaderFilter

 token:
  secret: user_token
user service에서 회원가입과 로그인 외 Get으로 요청될 경우 AuthorizationHeaderFilter를 추가하였다.
AuthorizationHeaderFilter.java
@Component
@Slf4j
public class AuthorizationHeaderFilter extends AbstractGatewayFilterFactory<AuthorizationHeaderFilter.Config> {

    Environment env;

    public AuthorizationHeaderFilter(Environment env) {
        super(Config.class);
        this.env = env;
    }

    public static class Config {

    }

    // login -> token -> users (with token) -> header (include token)
    @Override
    public GatewayFilter apply(AuthorizationHeaderFilter.Config config) {
        return ((exchange, chain) -> {
            ServerHttpRequest request = exchange.getRequest();

            // 사용자가 요청한 정보에서 로그인 했을 때 받았던 토큰이 잘 발급되었나 확인

            // Authorization을 판단하기 위한 토큰 정보 Header에 포함시킬 것임
            if (!request.getHeaders().containsKey(HttpHeaders.AUTHORIZATION))
            {
                return onError(exchange, "No authorization header", HttpStatus.UNAUTHORIZED);
            }

            // 정상적인 로그인이 되어있는 상태라면?
            String authorizationHeader = request.getHeaders().get(HttpHeaders.AUTHORIZATION).get(0); // 반환값은 배열 형태이기 때문에 0번쨰 값 가져오기
            String jwt = authorizationHeader.replace("Bearer", "");

            if (!isJwtValid(jwt)) {
                return onError(exchange, "JWT token is not valid", HttpStatus.UNAUTHORIZED);
            }

            // response 작업
            return chain.filter(exchange);
        });
    }

    private boolean isJwtValid(String jwt) {
        boolean returnValue = true;

        String subject = null;

        try {
            subject = Jwts.parser().setSigningKey(env.getProperty("token.secret")) // 복호화
                    .parseClaimsJws(jwt).getBody()
                    .getSubject();
        } catch (Exception ex) {
            returnValue = false;
        }

        if (subject == null || subject.isEmpty()) {
            returnValue = false;
        }

        return returnValue;
    }

    // Mono: 단일 데이터값 (단일값이 아닌 Flux 사용) -> Spring WebFlux
    private Mono<Void> onError(ServerWebExchange exchange, String err, HttpStatus httpStatus) { // 비동기 방식으로 처리
        ServerHttpResponse response = exchange.getResponse(); // 서블릿 객체 사용하지 않음
        response.setStatusCode(httpStatus);

        log.error(err);
        return response.setComplete();
    }
}
토큰 없이 welcome을 요청한다면?
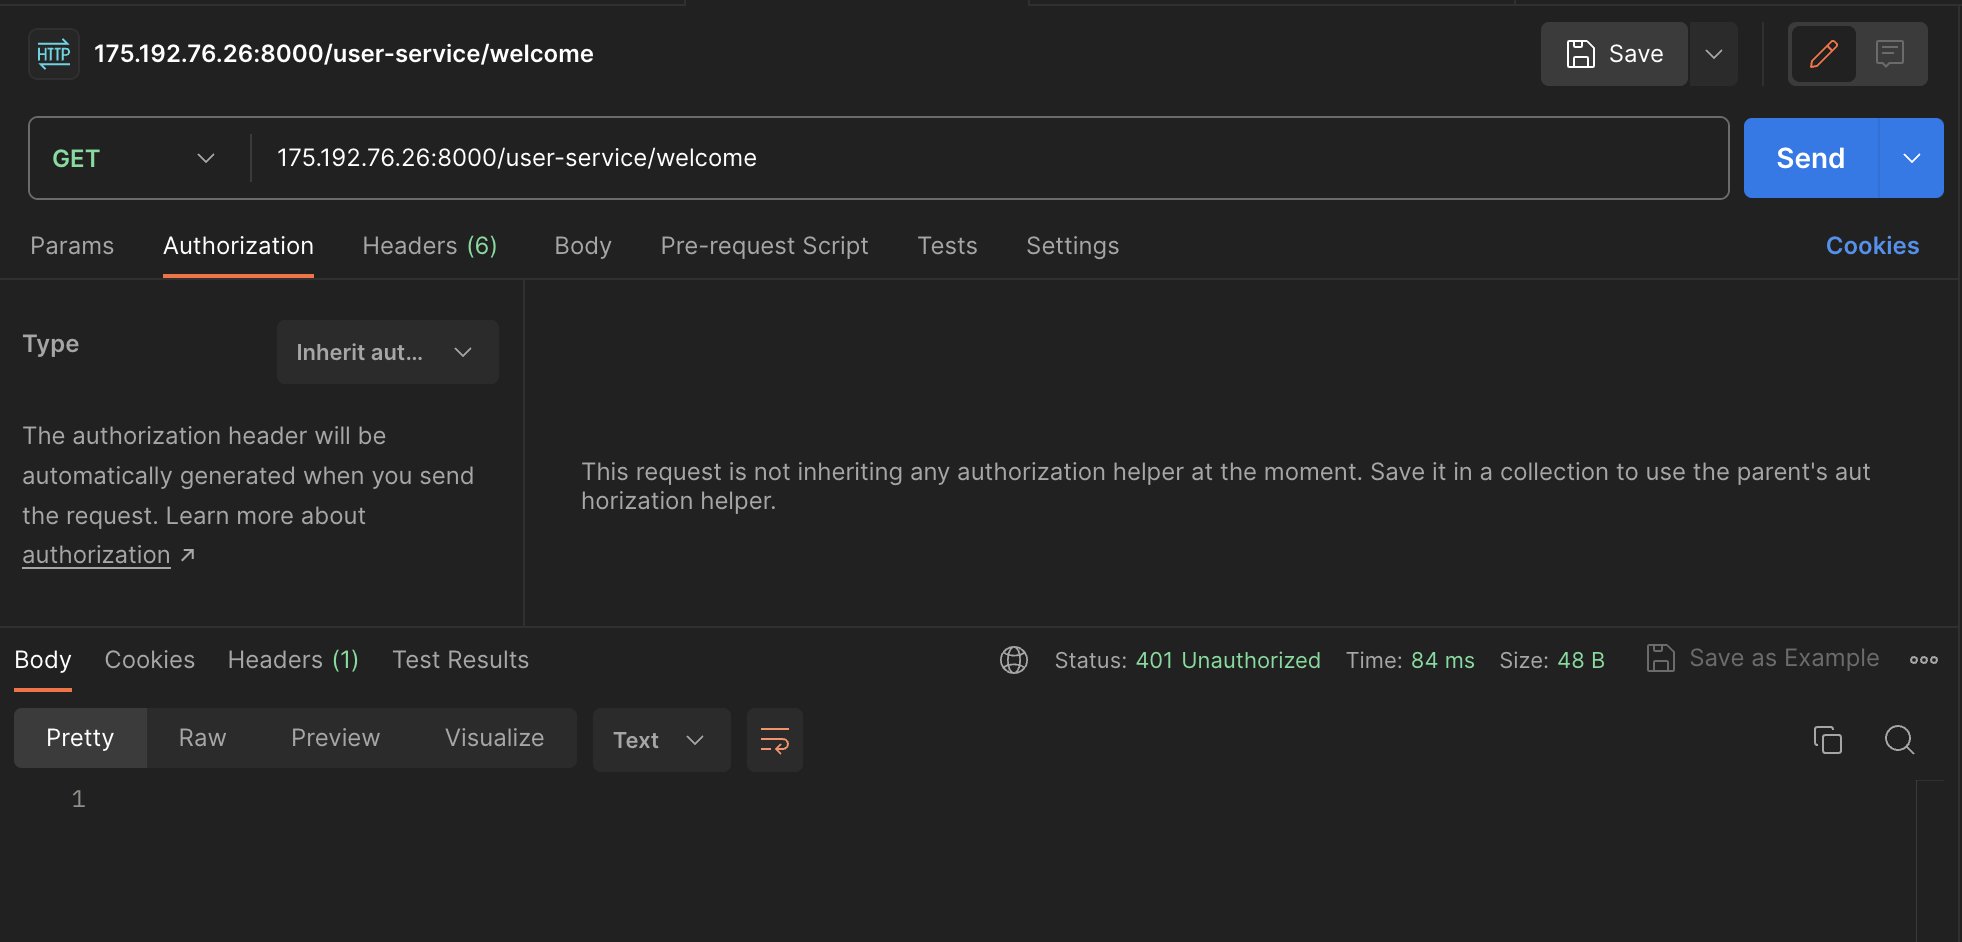
사용자가 요청하는 Get메서드는 인증을 거친 후에 권한을 넣어주어야 하는데 빠졌다는 의미이다.
다시, 토큰과 함께 요청한다면?
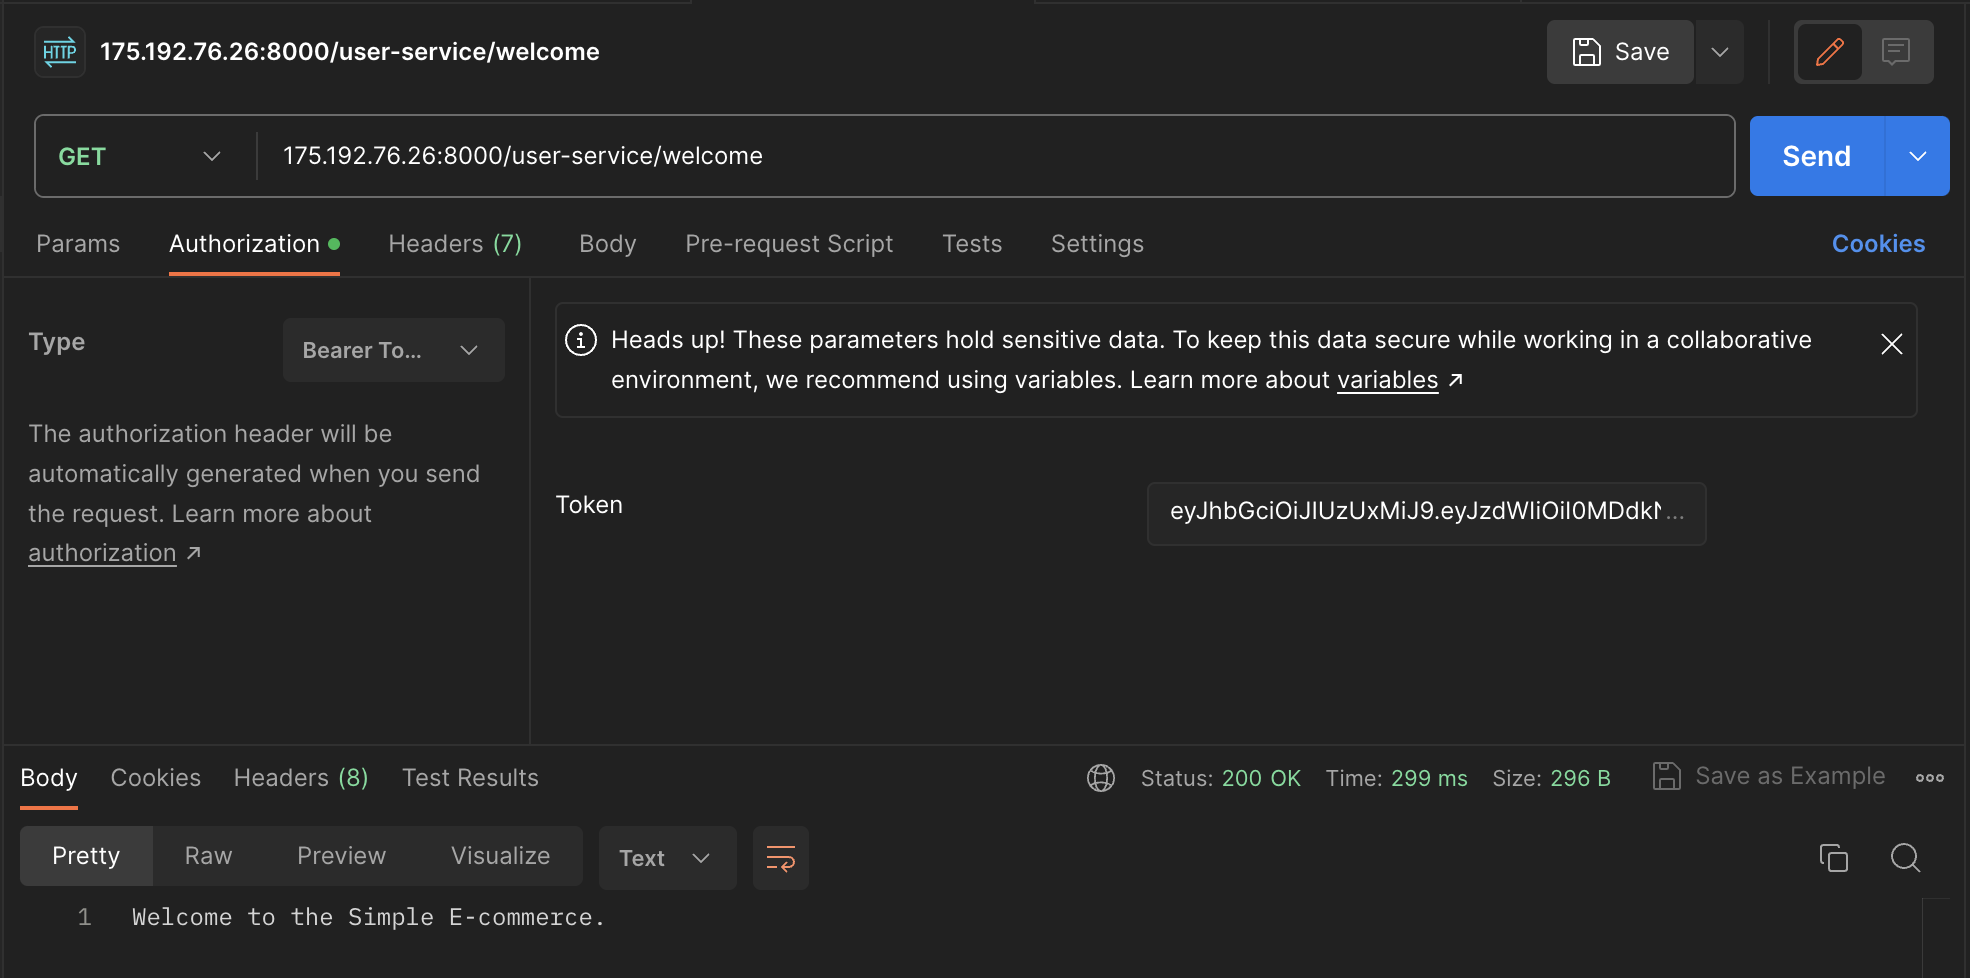

디버깅 모드에서 확인해보니까 JWT에 토큰값이 들어와있었고 복호화를 통해 subject 값이 userId와 같은 값인 것을 확인할 수 있었다.
'Spring' 카테고리의 다른 글
| Spring Cloud로 개발하는 마이크로서비스 애플리케이션(MSA) #8 (0) | 2023.08.11 |
|---|---|
| Spring Cloud로 개발하는 마이크로서비스 애플리케이션(MSA) #7 (0) | 2023.08.08 |
| Spring Cloud로 개발하는 마이크로서비스 애플리케이션(MSA) #5 (0) | 2023.07.28 |
| Spring Cloud로 개발하는 마이크로서비스 애플리케이션(MSA) #4 (0) | 2023.07.28 |
| 스프링부트와 AWS로 혼자 구현하는 웹 서비스 4장 (0) | 2023.07.16 |